What is the best car in Build and Kill Zombies?
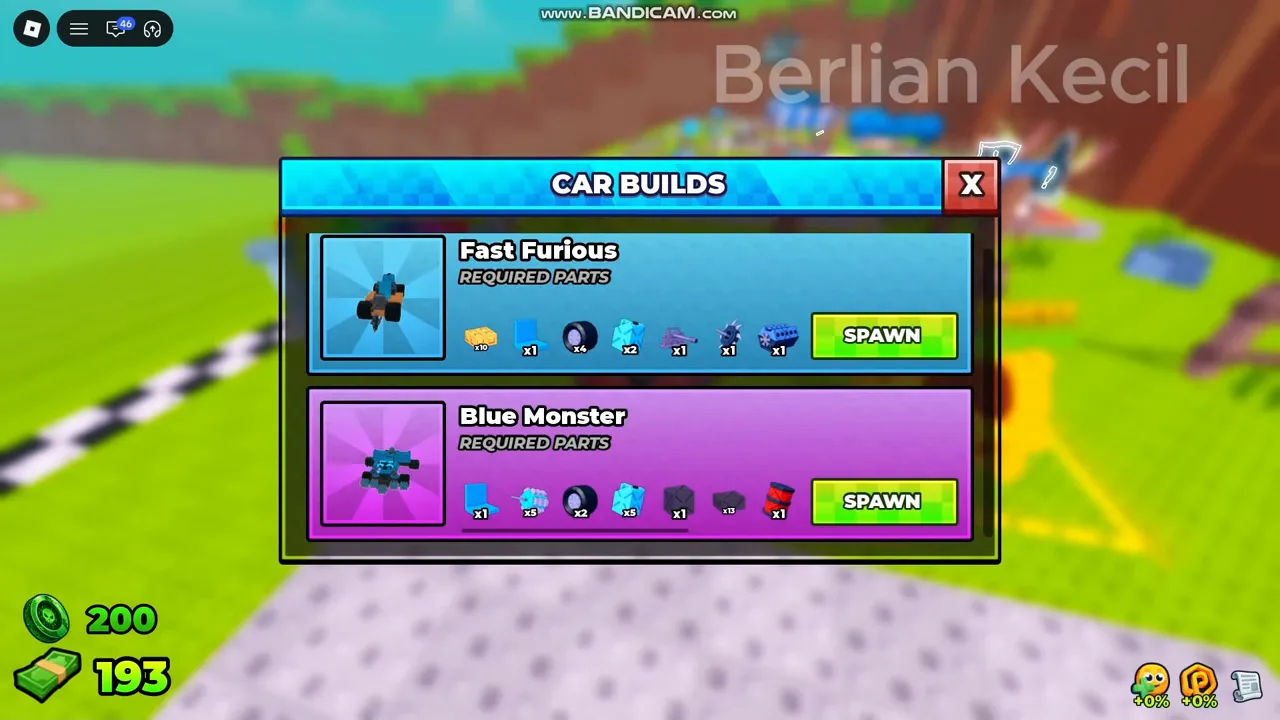
The best car is the best blueprint you can actually complete. Fast Furious and Blue Monster are the two readable blueprints; pick whichever your current parts are closest to finishing.
Best car builds
The blueprint path, a slot checklist, and fuel-vs-damage trade-offs.
Updated
There is no single best car, because the game runs on two different win conditions: distance (how far a build survives) and boss fights (whether you can take the shared boss encounter down). A build that excels at one usually sacrifices the other.
So the honest answer is a framework: pick the blueprint you can actually complete, fill the mandatory slots first, then specialise for the runs you play most.
Vehicles themselves are gated by Required Parts sets — Fast Furious and Blue Monster are the two blueprints readable in current footage, each wanting a specific pile of parts (counts like x10, x1, x4, x2, x1 were read off the blueprint board).
The practical rule: open Car Builds, find the blueprint with the fewest pieces you are missing, and roll toward that category. The Missing Parts board tells you exactly what is left, and a coin top-up can finish a set that is one or two pieces away.
Whatever blueprint you chase, a drivable build always needs the same core slots filled. Footage of working cars shows this set again and again: engine, wheels, seat, and fuel before any weapon goes on.
After the core, the next layer is purpose: armour to survive contact, a front-facing support to clear the road, and boost for reach. If a slot is empty while cash sits in the bank, that is your next purchase.
| Priority | Slot | Why |
|---|---|---|
| 1 | Engine | Nothing moves without it |
| 2 | Wheels + Seat | Steer and drive — the tutorial's own order |
| 3 | Fuel | The run timer; a dry tank ends the payout |
| 4 | Front support | Clears the wave the car is driving into |
| 5 | Armour | Keeps the engine alive on deep runs |
| 6 | Boost | Stretches distance when fuel allows |
Every build spends its slots on one of two currencies: fuel (metres) and damage (kills). Both pay cash — distance and kills are the two confirmed income taps — so the trade is about which one your runs are currently bottlenecked on.
If runs end dry at the same checkpoint every time, add fuel. If runs end in a zombie pile-up with the tank half full, add damage. Upgrading the weaker half is always cheaper than upgrading the stronger one.
Start with the rolled basics, target one blueprint's part list, fill missing pieces through that category's roll station, then specialise once the vehicle spawns.
Redeem the COMMUNITY code before your first serious push — its Small Engine and Small Tank cover two of the six checklist slots for free, and CashDrop's 500 funds the first missing-piece gap.
FAQ
The best car is the best blueprint you can actually complete. Fast Furious and Blue Monster are the two readable blueprints; pick whichever your current parts are closest to finishing.
Build for whichever blocks you today. Dry-tank endings mean more fuel; dying in the wave means more damage. One run, one purpose.
Engine, wheels, seat, and fuel before anything else — that is the tutorial's own order and the difference between a rolling car and a parked pile of parts.